

Multi-Writer Safety
Cache Volumes can safely be accessed concurrently, allowing multiple runners to read and write cache data simultaneously. When you request a Cache Volume, Namespace creates a fork of the most recent cache version. Each compute instance receives its own private copy of the Cache Volume as it existed at the time of the last successful cache commit.Lifecycle Management
Cache Volumes follow a “last write wins” model. Each committed cache state is a generation, and every new generation is forked from an existing one, so a tag builds up a lineage of generations over time.- First request: creates an empty generation as the starting point.
- Subsequent requests: a new instance forks the most recent committed generation.
- Successful completion: when an instance terminates cleanly (exit code 0), the cache state it wrote is committed as a new generation and becomes the parent for later forks in its lineage.
- Failed instances: cache changes from instances that do not complete cleanly are discarded and never become a generation.
Inspecting a cache tag
You can inspect the live state of a cache tag from the Cache Volumes page in the dashboard.- The tag list shows each tag’s current size as used / requested (for example,
213 MB / 50 GB), along with the instances that most recently used it. - Opening a tag lists its recent generations, each with its own used / requested size and the instance that produced it.
- Opening a generation shows its lineage: the chain of ancestor generations it was forked from, each labeled with the job, repository, branch, and commit that produced it.
- When a job does not fork the latest generation, the lineage view includes a detail text explaining why, such as a cache miss (no cached volume on the assigned node) or a lineage reset (a volume existed but was not cloned).
Naming and Access Control
Cache Volumes are identified by unique tags that govern access across your workspace. Any compute instance can request access to a Cache Volume by specifying its tag, making it easy to share cached data across different workflows and jobs. Each tag maintains a versioned history of cache states, with Namespace automatically selecting the most appropriate version for new instances.Sizing and Storage Management
Dynamic Sizing
When requesting a Cache Volume, you specify a minimum space requirement. Namespace ensures your instance always has at least that amount of available space, but the actual volume size grows dynamically based on cached content.- Configuration: 50GB Cache Volume
- First instance: Starts with 50GB free space (0GB used)
- After storing 10GB: Volume contains 10GB used, 40GB free
- Second instance: Receives 60GB volume (10GB used from cache, 50GB free as requested)
Garbage Collection
Namespace employs intelligent garbage collection strategies to maintain optimal cache performance and prevent exceeding cache size that could lead to cache misses. Garbage collection policies are available for:- Docker Image caching
- Local build caching
- Bazel caching
Cache Hits and Misses
Namespace consistently provisions Cache Volumes with close to zero impact on startup latency. To achieve this, there may be rare scenarios of cache misses, to avoid delaying the startup. Namespace prefers the latest version over older versions. If this fails, stale cache versions are preferred over cache misses. At any moment a tag can have several generations alive across the fleet, typically one per node. When a job commits a new generation, it is advanced on that node first and then distributed in the background to nodes that do not yet hold a copy. A node that has not yet received the newest generation forks the most recent one it does have. Workloads that run many jobs distribute new generations across the fleet quickly and settle into consistent cache hits, while workloads that run few jobs are more likely to fork a slightly older generation. Applications using Cache Volumes should not assume that the cache contents match exactly the last committed version.Cache Volume Onboarding
Cache misses are more common during the initial onboarding phase, because its cache contents are not yet present across the fleet. Each time a job is allocated to a machine that does not hold the cache, it experiences a cache miss. When the job completes successfully, Namespace commits its cache data for future jobs. A later job allocated to the same machine receives the cached data and gets a cache hit. This feedback loop drives distribution of your data to ensure consistent cache hits over time. The more jobs you run, the more machines in the fleet hold the cache data, and the cache hit rate rises until you see consistent hits.Exceeding Cache Size
Cache Volumes provide the cache size you ask for (see Dynamic Sizing). Cached content can grow over time as jobs write more data into the volume. If a generation’s content grows past the configured cache size, it is still committed, but Namespace will not clone it for the next job. Instead, that job starts from an empty volume and a fresh lineage begins from there. This reset is scoped to the affected lineage. Other lineages and other tags are unaffected. A reset can also happen if you lower the configured size below the size of already-committed content. Example Scenario:- Configuration: 50GB Cache Volume
- Existing cache: 20GB of content
- First instance: receives a 70GB volume (20GB used + 50GB free)
- After storing 31GB: Volume contains 51GB used, 19GB free
- Second instance: Starts from an empty 50GB volume, because the previous generation exceeded the configured limit
Sharing a cache across parallel jobs
When you run jobs in parallel, such as a matrix build or a sharded test suite, you choose whether they share one cache tag or use separate tags. In most cases a single shared tag is the best choice. Cache Volumes are safe for many concurrent readers and writers (see Multi-Writer Safety), so parallel shards can all read from and write to the same tag. There is no merge step: each node keeps the last write it saw, and Namespace prefers the node with the most recent write while keeping others for coverage. Use separate tags only when shards have genuinely different working sets, such as a frontend shard that caches ayarn store and a backend shard that caches a Go build cache.
Splitting the cache there keeps each tag focused on the content it actually reuses.
Keep in mind that per-shard tags multiply storage: N tags each sized S account for roughly N × S of cache storage (see Usage).
For a read-mostly base layer shared across shards, consider whether a custom base image or artifact upload/download fits better than a Cache Volume.
Usage
Namespace accounts Cache Volume usage in two categories: cache snapshot usage and cache storage. They are billed independently and behave differently. You can analyze both on the Usage page of the dashboard.Cache snapshot usage
Cache snapshot usage is the active usage of a cache while it is attached to a running instance. On a cache hit, Namespace accounts snapshot usage as the lifetime of the attached instance times the size of the cache volume. This gives a measurement in GB-hours. For example, if an instance runs for one hour with a 100 GB cache volume attached, the billable metric will be 100 GB-hours. If an instance runs for 3 hours with a 50 GB cache volume attached, the metric would be 150 GB-hours. Larger caches increase this usage and faster runs reduce it. Snapshot usage typically dominates the cost of a cache volume.Cache storage
Cache storage is the at-rest cost of keeping your cache available so that Namespace can provision it onto new instances. A cache volume tag consumes storage proportional to the requested size of the volume, not the amount actually used. A 50 GB cache that only ever holds 10 GB of content still accounts storage for the full 50 GB. Namespace replicates each cache across the fleet to improve cache hit rates, but storage is accounted only once, regardless of the number of replicas or the number of instances attached to the cache. Cache storage accrues for as long as a cache generation is alive. Each new attachment to a cache tag refreshes its generation, so an actively used cache stays alive. Namespace automatically evicts cache volume generations after a grace period of inactivity. Once a generation is evicted, it can no longer serve cache hits and stops counting towards your usage. If you have specific requirements around cache volume expiration, contact our support team. To evict a cache ahead of its expiration, you can release it from the Cache Volumes page of the dashboard. Because storage is usually a small fraction of total cache cost, reducing the retention window rarely produces meaningful savings. The larger lever is right-sizing the cache, which lowers both snapshot and storage usage. See Choosing the Right Cache Size.Example for GitHub runners
- Configuration: runner profile with 50GB cache
- First run: cache storage accounting begins, adds 50GB-days per day.
- Second run: cache hit, runs for 10 minutes -> accounts for 500 GB-minutes.
- Third run: cache miss -> does not count towards cache usage.
- Another repository: If the same profile is used for a different repository, the cache is separate and usage is accounted separately.
Choosing the Right Cache Size
Size the cache to the working set your jobs actually use, then add 20-30% headroom. The goal is to avoid resets without paying for unused cache capacity. You can check actual usage for a tag in the Cache Volumes page of the dashboard and adjust from there.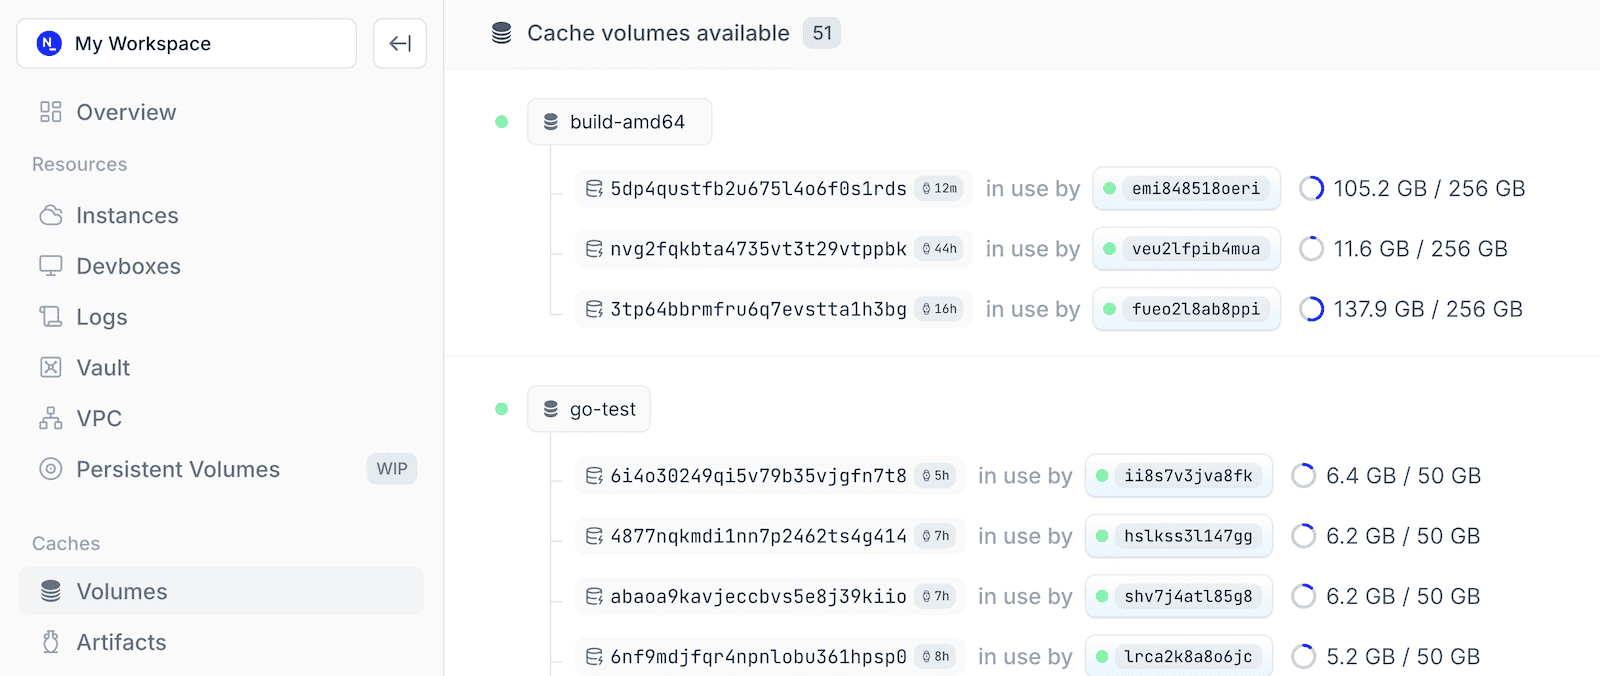
Method
Treat the size as a value to tune rather than set once:- Start large enough to avoid early resets.
- Monitor usage for your cache tag across the first two weeks.
- Adjust to the observed working set plus 20-30% headroom, so normal variation does not push the cache past its limit.
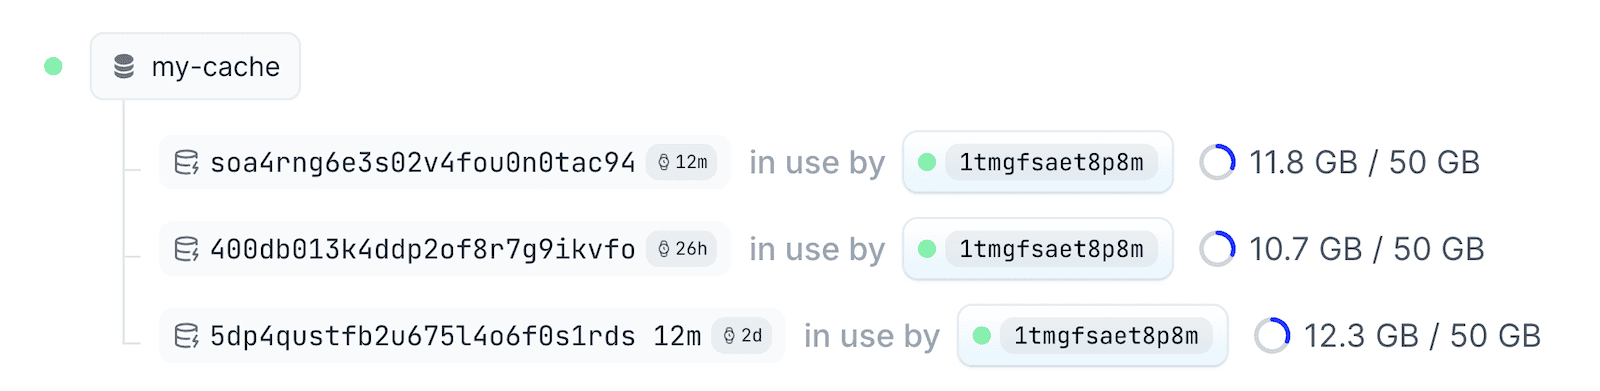
- Start: configure a 50GB Cache Volume to be safe against early resets
- Monitor: after two weeks, the Cache Volumes page shows usage peaking around 12GB
- Adjust: configure 16GB (12GB working set + ~30% headroom), cutting the billed size by more than two thirds while keeping room for variation
You don’t always need two weeks of data: if the configured size already dwarfs what your jobs use (for example, a 50GB cache holding only ~200MB), reduce it early and continue monitoring.
Changing the cache size
The configured size controls what new runners request. Changing it does not rewrite existing generations.- Raising the size is safe. Older, smaller volumes remain valid clone candidates and are resized up when they are cloned, before being attached to the new instance.
- Lowering the size can trigger a lineage reset if already-committed content is larger than the new size. If the committed content still fits within the new size, lowering it has no such effect.