> ## Documentation Index
> Fetch the complete documentation index at: https://namespace.so/docs/llms.txt
> Use this file to discover all available pages before exploring further.
# High-Performance Developer Environments with Devboxes
export const KeepTabPosition = () => {
useEffect(() => {
const stateKey = "__namespaceKeepTabPosition";
const releaseState = state => {
state.instances -= 1;
if (state.instances > 0) return;
state.removeListeners();
if (window[stateKey] === state) delete window[stateKey];
};
const existingState = window[stateKey];
if (existingState) {
existingState.instances += 1;
return () => releaseState(existingState);
}
const maxSettleTime = 250;
const requiredStableFrames = 3;
const positionTolerance = 0.5;
let animationFrame;
let observer;
let settleDeadline;
let stableFrames = 0;
let tabListToKeep;
let tabListTop;
const findTab = event => {
if (!(event.target instanceof Element)) return null;
return event.target.closest(".tab-container [role='tab']");
};
const findScrollContainer = element => {
for (let parent = element.parentElement; parent; parent = parent.parentElement) {
const {overflowY} = getComputedStyle(parent);
if ((overflowY === "auto" || overflowY === "scroll") && parent.scrollHeight > parent.clientHeight) {
return parent;
}
}
return null;
};
const stopKeepingPosition = () => {
if (animationFrame) cancelAnimationFrame(animationFrame);
animationFrame = undefined;
observer?.disconnect();
tabListToKeep = undefined;
};
const restoreTabListPosition = () => {
if (!tabListToKeep?.isConnected) return 0;
const offset = tabListToKeep.getBoundingClientRect().top - tabListTop;
if (Math.abs(offset) < positionTolerance) return offset;
const scrollOptions = {
top: offset,
behavior: "instant"
};
const scrollContainer = findScrollContainer(tabListToKeep);
if (scrollContainer) {
scrollContainer.scrollBy(scrollOptions);
} else {
window.scrollBy(scrollOptions);
}
return offset;
};
const settlePosition = () => {
const offset = restoreTabListPosition();
stableFrames = Math.abs(offset) < positionTolerance ? stableFrames + 1 : 0;
if (stableFrames >= requiredStableFrames || performance.now() >= settleDeadline) {
stopKeepingPosition();
return;
}
animationFrame = requestAnimationFrame(settlePosition);
};
observer = new MutationObserver(() => {
stableFrames = 0;
restoreTabListPosition();
});
const keepTabListInPlace = tab => {
stopKeepingPosition();
tabListToKeep = tab.closest("[role='tablist']");
if (!tabListToKeep) return;
tabListTop = tabListToKeep.getBoundingClientRect().top;
settleDeadline = performance.now() + maxSettleTime;
stableFrames = 0;
observer.observe(document.getElementById("content") ?? document.documentElement, {
attributes: true,
attributeFilter: ["aria-selected", "class"],
childList: true,
subtree: true
});
animationFrame = requestAnimationFrame(settlePosition);
};
const selectWithoutNavigation = event => {
if (!event.isTrusted) return;
const tab = findTab(event);
if (!tab) return;
keepTabListInPlace(tab);
event.preventDefault();
event.stopPropagation();
tab.click();
restoreTabListPosition();
};
const selectWithKeyboard = event => {
if (!event.isTrusted) return;
const tab = findTab(event);
const tabList = tab?.closest("[role='tablist']");
if (!tab || !tabList) return;
const tabs = Array.from(tabList.querySelectorAll(":scope > [role='tab']"));
const currentIndex = tabs.indexOf(tab);
let nextIndex;
switch (event.key) {
case "ArrowLeft":
nextIndex = (currentIndex - 1 + tabs.length) % tabs.length;
break;
case "ArrowRight":
nextIndex = (currentIndex + 1) % tabs.length;
break;
case "Home":
nextIndex = 0;
break;
case "End":
nextIndex = tabs.length - 1;
break;
case "Enter":
case " ":
nextIndex = currentIndex;
break;
default:
return;
}
keepTabListInPlace(tab);
event.preventDefault();
event.stopPropagation();
tabs[nextIndex]?.click();
tabs[nextIndex]?.focus({
preventScroll: true
});
restoreTabListPosition();
};
document.addEventListener("click", selectWithoutNavigation, true);
document.addEventListener("keydown", selectWithKeyboard, true);
const state = {
instances: 1,
removeListeners: () => {
stopKeepingPosition();
document.removeEventListener("click", selectWithoutNavigation, true);
document.removeEventListener("keydown", selectWithKeyboard, true);
}
};
window[stateKey] = state;
return () => releaseState(state);
}, []);
return null;
};
Devboxes are managed Linux and macOS development environments for people and AI coding agents. Each Devbox is a remote machine with persistent storage, reachable over SSH or from your local IDE.
Linux Devboxes run from a container image you choose and include Docker. macOS Devboxes run on Apple Silicon, with a choice of macOS and Xcode versions. Because the environment comes from a shared definition, your team and your agents work on the same setup.
Let a coding agent install the CLI and create your first Devbox.
Install the CLI, create a Devbox, and start an agent in a session.
Create a Devbox in the browser, with nothing to install.
Get Started with an Agent
The quickest way to get started is to let a coding agent do it for you.
Install the [Namespace devboxes skill](/docs/reference/devbox-cli/agent-skills) for your coding agent.
Installs the skill for every project on this machine:
```bash theme={null}
npx skills add namespacelabs/agent-skills --global
```
Installs the skill into the current project only. Run this from the project directory:
```bash theme={null}
npx skills add namespacelabs/agent-skills
```
The skill gives the agent a repeatable workflow for creating Devboxes, loading source code, running commands, and cleaning up after the task.
Ask your agent to create a Devbox:
```text wrap Agent Prompt theme={null}
create a devbox
```
If the [Devbox CLI](/docs/reference/devbox-cli) is not installed, the agent installs it and runs `devbox login`. Complete the login in your browser when prompted.
Get Started with the CLI
Follow these steps to install the CLI and create a Devbox from your terminal.
```bash theme={null}
curl -fsSL get.namespace.so/devbox/install.sh | bash
```
```bash theme={null}
curl -fsSL get.namespace.so/devbox/install.sh | bash
```
Run the following command in PowerShell:
```powershell theme={null}
irm https://get.namespace.so/devbox/install.ps1 | iex
```
Restart your terminal if `devbox` is not available on your `PATH` after installation.
Connecting over SSH also requires an [OpenSSH client](https://learn.microsoft.com/windows-server/administration/openssh/openssh_install_firstuse). Most modern Windows installations include one.
Confirm the installation:
```bash theme={null}
devbox version
```
```bash theme={null}
devbox login
```
The command prints a login URL and opens it in your browser. Complete the flow there, and the CLI stores a user credential in your operating system's user configuration directory.
Check the stored credential at any time:
```bash theme={null}
devbox auth check
```
`devbox create` provisions a Devbox and activates it, so it is ready to connect to when the command returns. Supply its configuration interactively or as flags.
The CLI prompts for a name, an image, and a machine size:
```bash theme={null}
devbox create --checkout github.com/your-org/your-repo
```
Pass every value as a flag to skip the prompts:
```bash theme={null}
devbox create --name my-devbox --image builtin:default --size m --checkout github.com/your-org/your-repo
```
`--checkout` clones a repository into the Devbox and requires a [connected GitHub organization](#getting-started-dashboard). Omitting it applies the workspace default repository, and `--no_checkout` skips the checkout entirely.
See [`devbox create`](/docs/reference/devbox-cli/create) for the full set of options, including Blueprints, ephemeral Devboxes, and specification files.
Connect to a [session](/docs/devbox/connecting#sessions) on the Devbox. A session keeps running when you close your terminal or disconnect, so work you start in it carries on without you.
```bash theme={null}
devbox session connect --session agent
```
The CLI lists your Devboxes and their sessions, with an option to start a new session.
Connecting to a stopped Devbox starts it first, and your files persist across stop and start cycles.
Start a coding agent in the Devbox and give it a task. The agent works on the Devbox itself, with its own files, tools, and terminal:
```bash theme={null}
amp
```
```bash theme={null}
claude
```
```bash theme={null}
codex
```
```bash theme={null}
copilot
```
```bash theme={null}
cursor-agent
```
```bash theme={null}
opencode
```
Get Started with the Dashboard
The Dashboard needs no local installation. Follow these steps to create your first Devbox in the browser and open a shell in it.
Open [Devboxes](https://cloud.namespace.so/workspace/devboxes) in the Namespace Dashboard and connect a code provider so Namespace can clone your repositories. Devboxes can check out from GitHub and [Cursor Origin](https://cursor.com).
If you have not connected a provider yet, choose one from the Devboxes page:
* For GitHub, press **Connect with GitHub** and follow the instructions to install the Namespace GitHub app.
* For Cursor Origin, press **Other providers**, then select Cursor Origin on the Code Providers page.
After you connect a provider, use [Code Providers](https://cloud.namespace.so/workspace/code/providers) to connect another one.
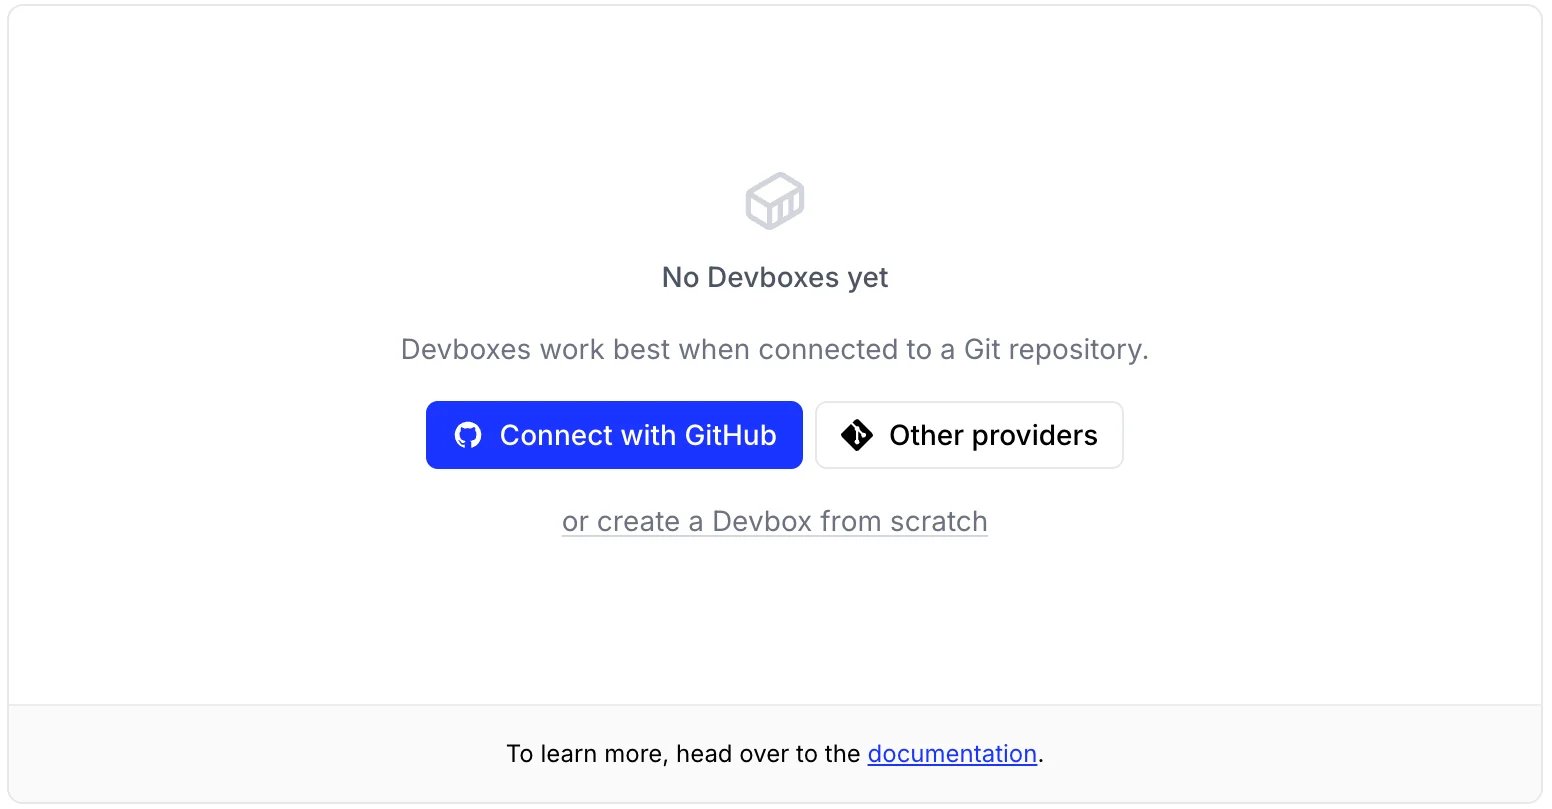 Connecting a provider lets Namespace clone your repositories into a Devbox, which is how you work on your own code. To look around first, select **create a Devbox from scratch** and connect a provider later.
Press **+ Create** on the Devboxes page.
Connecting a provider lets Namespace clone your repositories into a Devbox, which is how you work on your own code. To look around first, select **create a Devbox from scratch** and connect a provider later.
Press **+ Create** on the Devboxes page.
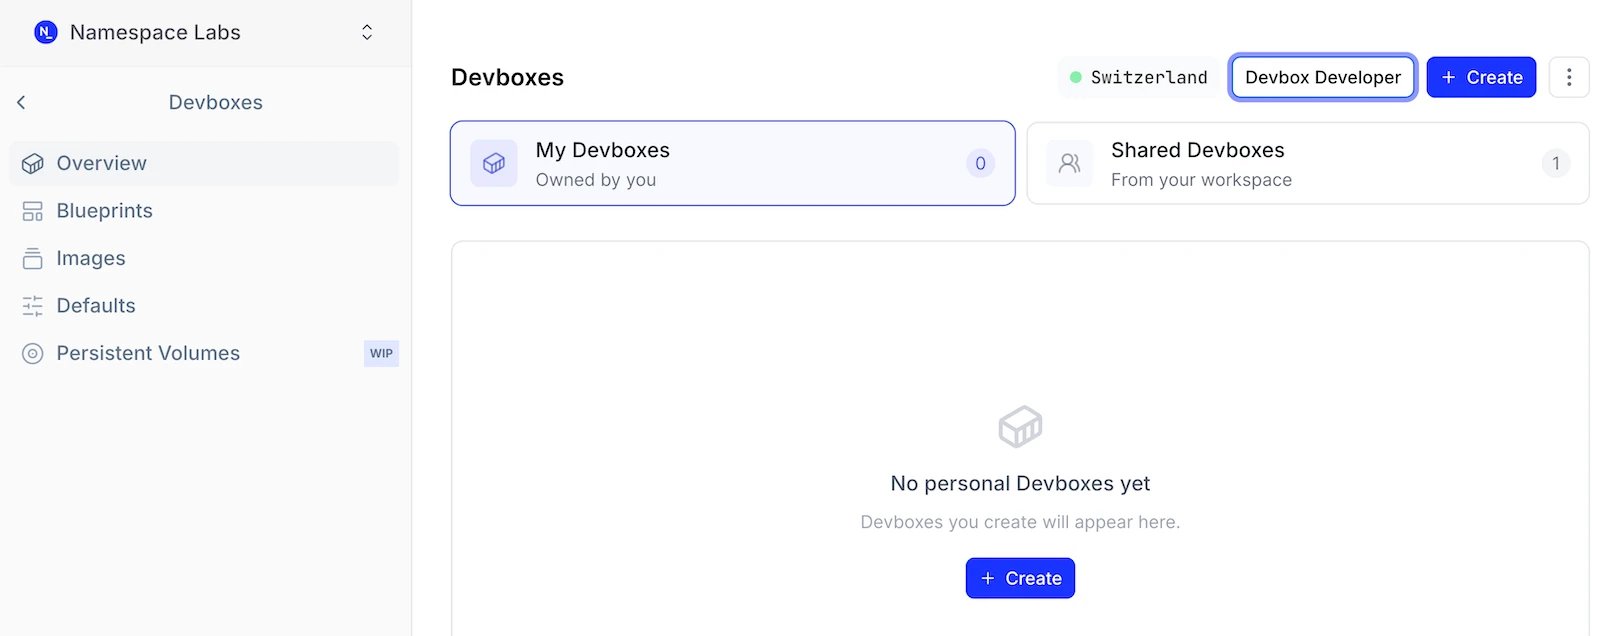 Give your Devbox a name or keep the generated one. Then press **Repository** and select the repository to check out.
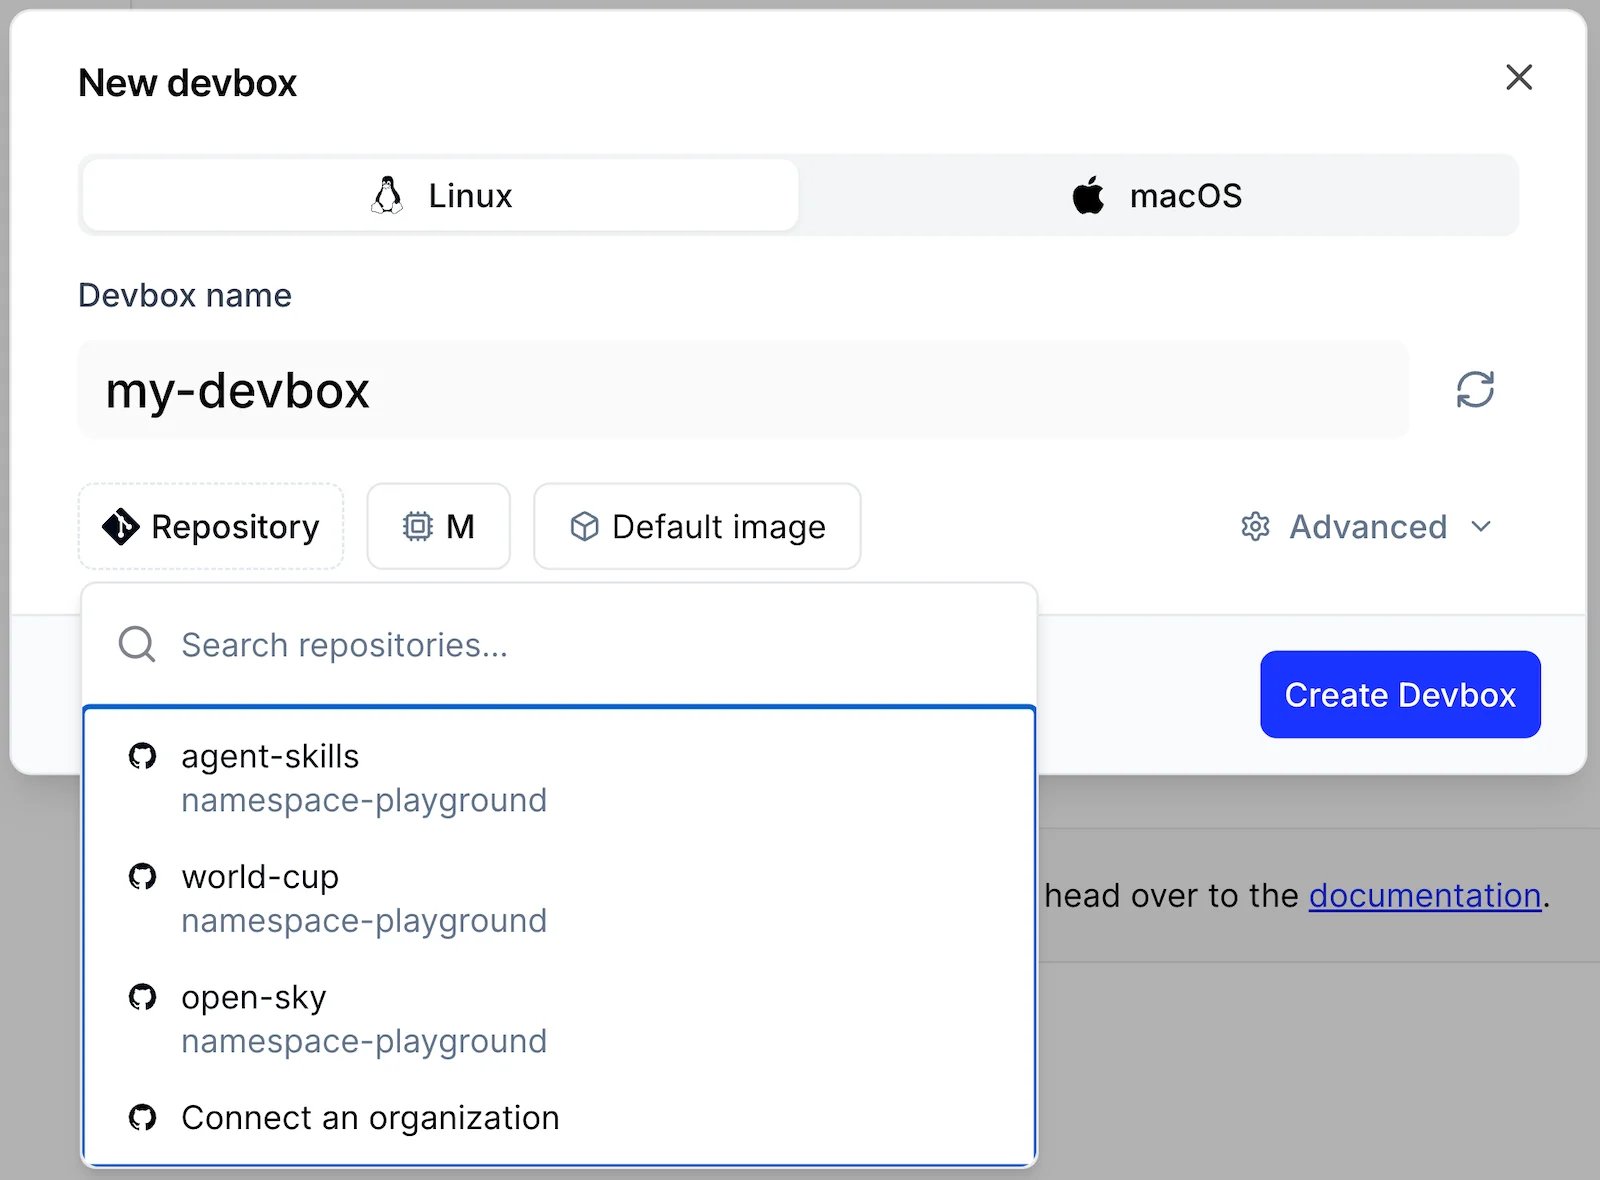 The list shows the repositories Namespace can reach through the GitHub app. If the one you want is missing, or you skipped the previous step, use the **Connect an organization** entry at the end of the list.
Press **Create Devbox**. After a few seconds, your Devbox will be ready to use.
The Devbox page shows its state and its initialization log while it starts.
The list shows the repositories Namespace can reach through the GitHub app. If the one you want is missing, or you skipped the previous step, use the **Connect an organization** entry at the end of the list.
Press **Create Devbox**. After a few seconds, your Devbox will be ready to use.
The Devbox page shows its state and its initialization log while it starts.
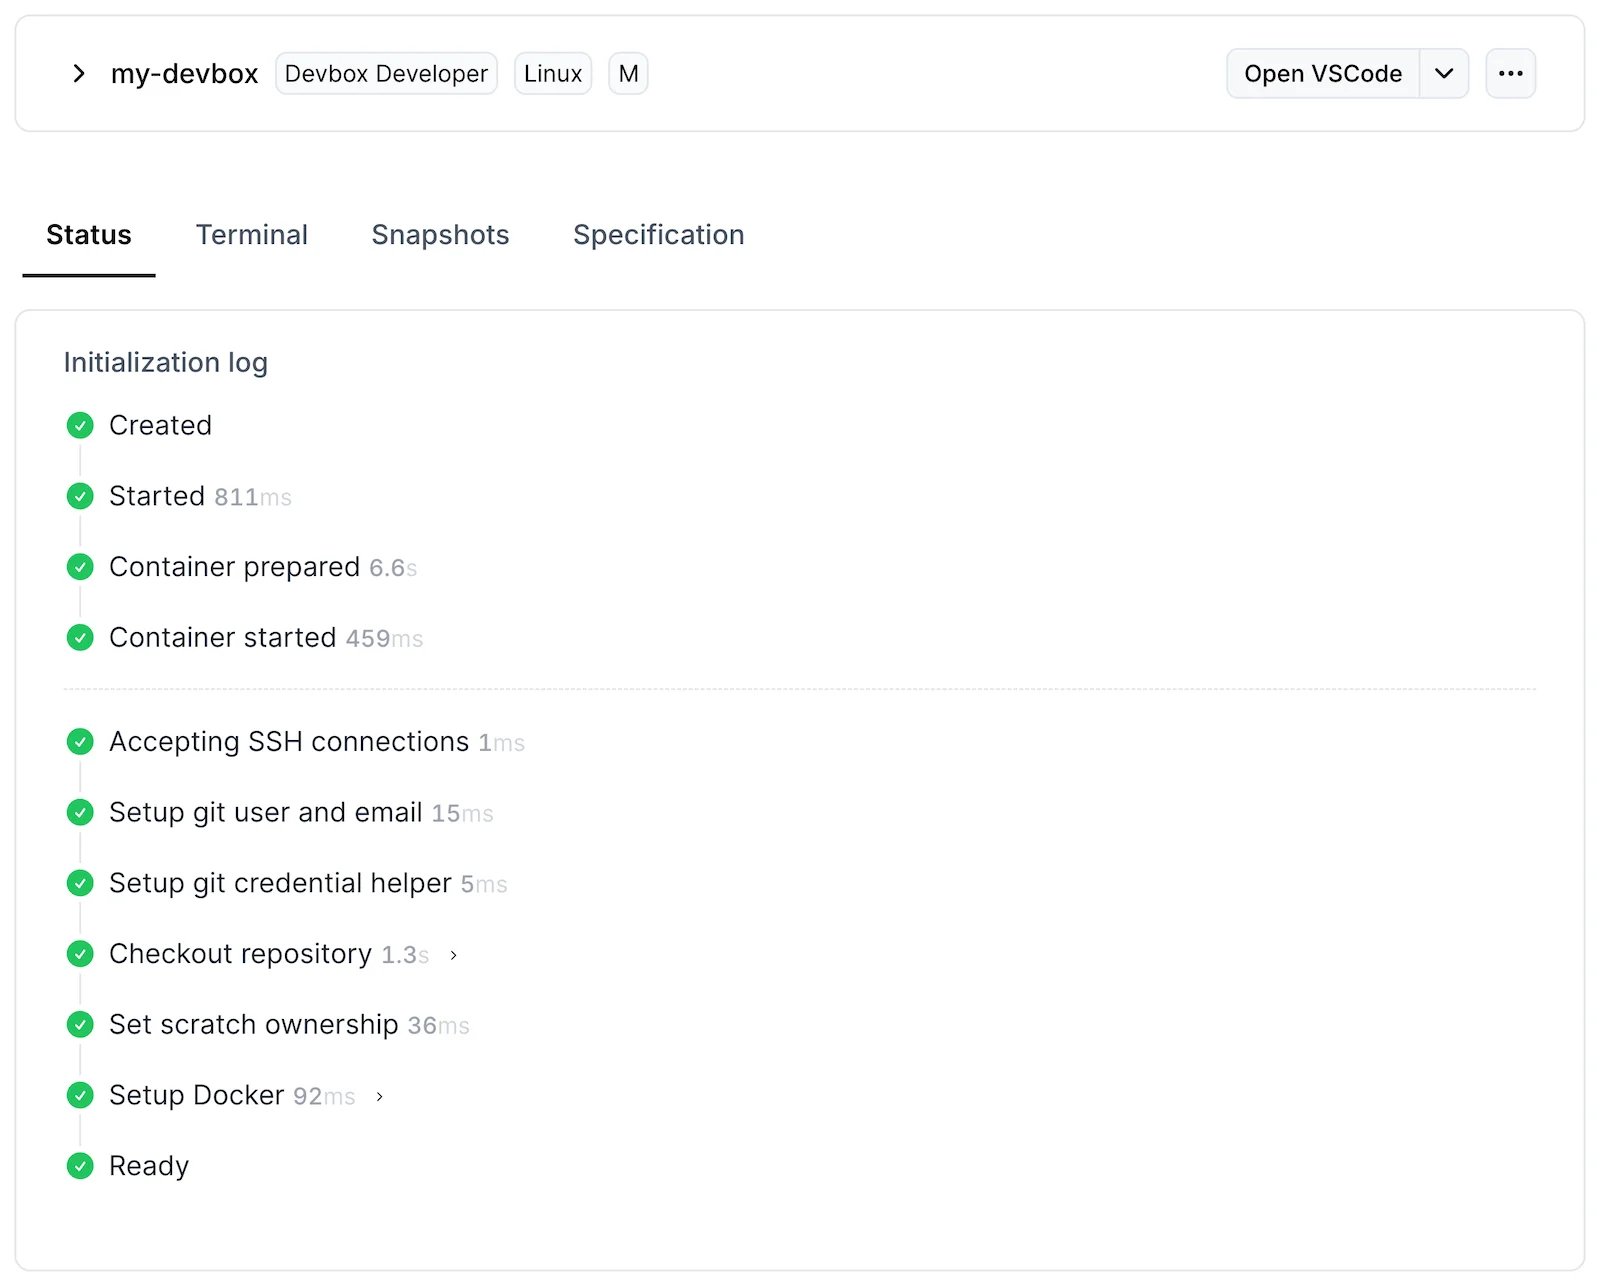 Once the log reaches **Ready**, open the **Terminal** tab (for a shell in the Devbox without installing anything locally) and run `ls` to see the cloned files:
```bash theme={null}
ls
```
Use the **Open VSCode** dropdown to open the Devbox in VS Code, Cursor, or VS Code for the Web. See [IDEs](/docs/devbox/ides) for the full list of supported editors, including JetBrains and Zed.
## Next Steps
Create, list, stop, and delete Devboxes.
Open a shell on a Devbox with SSH or a session.
Open a Devbox in VS Code, Cursor, JetBrains, or Zed.
## Enterprise Support
Need dedicated capacity, custom machine shapes, or specialized support for your development team? Contact our [support team](mailto:support@namespace.so) for consultation on complex development environment requirements.
This documentation is built and hosted on [Mintlify](https://mintlify.com), a developer documentation platform.
Once the log reaches **Ready**, open the **Terminal** tab (for a shell in the Devbox without installing anything locally) and run `ls` to see the cloned files:
```bash theme={null}
ls
```
Use the **Open VSCode** dropdown to open the Devbox in VS Code, Cursor, or VS Code for the Web. See [IDEs](/docs/devbox/ides) for the full list of supported editors, including JetBrains and Zed.
## Next Steps
Create, list, stop, and delete Devboxes.
Open a shell on a Devbox with SSH or a session.
Open a Devbox in VS Code, Cursor, JetBrains, or Zed.
## Enterprise Support
Need dedicated capacity, custom machine shapes, or specialized support for your development team? Contact our [support team](mailto:support@namespace.so) for consultation on complex development environment requirements.
This documentation is built and hosted on [Mintlify](https://mintlify.com), a developer documentation platform.